How to Build a Step Stool
A step stool is the kind of build that sounds simple right up until the legs start wobbling. This plan keeps it stable without overcomplicating the joinery.
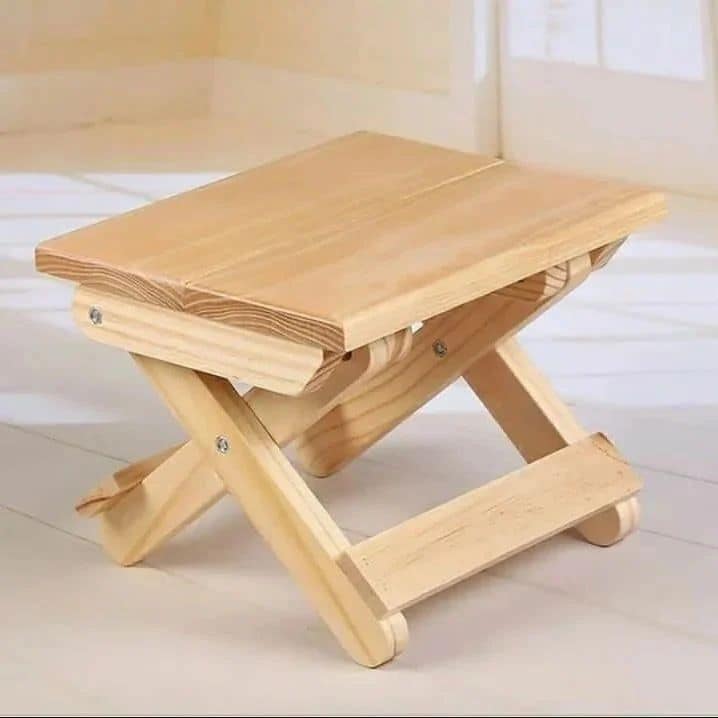
A step stool is a genuinely useful build — kids need one in the bathroom, kitchens need one for high shelves, garages need one next to the workbench. This plan builds a single-step stool, 9 inches tall, solid enough to stand on without thinking about it. The key detail is a wide foot (the base) that prevents tipping.
Finished dimensions: 14 inches wide, 11 inches deep, 9 inches tall.
What you will need
Tools:
- Miter saw or circular saw
- Drill/driver
- Tape measure and speed square
- Random orbit sander or sanding block
- Clamps
That is it. This is a drill-and-screw build — no jigs, no dados, nothing that requires machinery you have not got yet.
If you want to try a taller two-step version later, the construction logic is the same as the farmhouse bench — leg assemblies connected by an apron — just scaled down.
Materials:
- 1x12 pine board, 4 feet (for the top step and side panels)
- 1x4 pine board, 2 feet (for the back brace and optional foot rail)
- 1-5/8-inch wood screws
- Wood glue
- 80 and 220-grit sandpaper
- Finish: a coat or two of wipe-on poly or a painted finish both work well
The cut list
| Part | Material | Size | Qty |
|---|---|---|---|
| Step (top) | 1x12 pine | 14“ x 10“ | 1 |
| Side panels | 1x12 pine | 9“ x 10-1/4“ | 2 |
| Back brace | 1x4 pine | 12-1/2“ | 1 |
The side panels are notched at the bottom front corner — a 1-inch by 1-inch notch — so the stool sits on four contact points instead of a continuous edge. This keeps it from rocking on slightly uneven floors.
Step by step
1. Cut all the pieces. Cut the step top, both side panels, and the back brace. Stack the two side panels together and cut them at the same time — they will be identical.
2. Cut the foot notches. Mark a 1-inch by 1-inch notch on the bottom front corner of each side panel. Cut it with a jigsaw or a handsaw and chisel. This creates two front feet and keeps the back edge as the rear contact point — four point contact, no rocking.
3. Sand everything before assembly. Much easier now than after the stool is together. Work through 80 then 220 on all faces.
4. Attach the back brace. The back brace runs across the top rear, connecting the inside faces of the two side panels. Glue and drive two screws from each side panel into the brace ends. This brace prevents the sides from splaying outward.
5. Attach the step top. Position the step top flush with the top edges of the side panels. The step top overhangs the front of the side panels by about 3/4 inch for a cleaner look and a natural grip-edge. Glue and drive screws down through the step top into the top edges of the side panels — two screws per side. Pre-drill.
6. Final sand and finish. Round over every edge lightly with 220-grit — no sharp corners on something small kids use. Apply finish, let it cure fully before putting the stool into service.
Mistakes to avoid
Skipping the foot notches. A flat-bottomed step stool rocks on any floor that is not perfectly level. The two-minute notch cut is what makes it sit solid. Do not skip it.
Attaching the step top with screws only, no glue. The top takes direct load and lateral force every time someone steps on the edge. Glue plus screws holds; screws alone will work loose over time.
Not pre-drilling near edges. Pine splits at the end grain. Every screw within 2 inches of a board end needs a pilot hole.
Making the stool too tall. Nine inches is the right height for a standard-step stool — tall enough to be useful, low enough to be stable. Taller than 11 or 12 inches and a single-step stool gets tippy under side load.
Want more project plans?
This is one afternoon build. If you want complete cut lists and dimensioned drawings across a larger project library, our full review covers the options and what is inside each of them.