How to Read Woodworking Plans (A Beginner's Guide)
Most beginners don't fail at cutting or joinery — they fail at the plan. A number in the wrong place, a view they misread, a cut list they didn't check before buying timber. Understanding how to read a plan properly is a skill that makes every build go smoother.
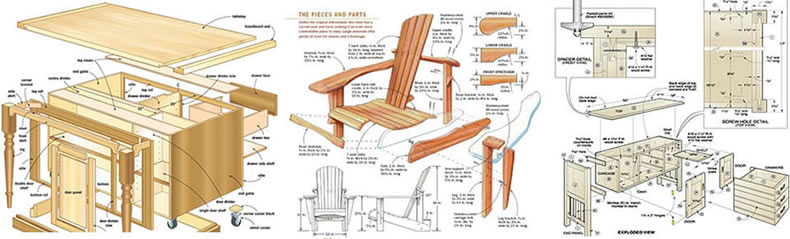
A woodworking plan is a communication tool — it’s the designer’s attempt to get a three-dimensional object out of their head and into yours without standing next to you in the workshop. The better you get at reading plans, the less you have to guess, improvise, or recut.
This guide covers what the main elements of a plan mean and how to use them in practice.
The cut list
Once you have a complete cut list in front of you, the cut list calculator turns it into a shopping list: how many boards to buy, and where to make each cut with the kerf accounted for.
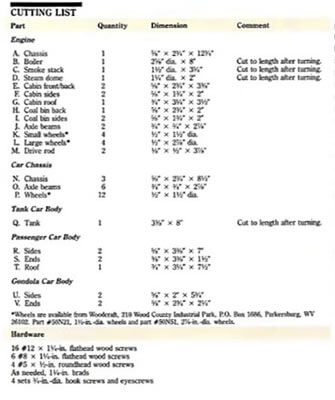
The cut list is the first thing to read, and it’s the most important. It lists every piece the project needs, with three dimensions for each: thickness × width × length. Most cut lists also give each piece a name or label that corresponds to labels on the diagrams.
A typical cut list entry looks like this:
| Part | Qty | Thickness | Width | Length | Material |
|---|---|---|---|---|---|
| Seat slats | 3 | 1½ in (38mm) | 3½ in (90mm) | 47¼ in (1200mm) | Pine |
| Legs | 4 | 1½ in (38mm) | 3½ in (90mm) | 17 in (430mm) | Pine |
| Long apron | 2 | ¾ in (19mm) | 3½ in (90mm) | 43¼ in (1100mm) | Pine |
| Short apron | 2 | ¾ in (19mm) | 3½ in (90mm) | 13½ in (340mm) | Pine |
Read the cut list before buying timber, not after. It tells you exactly what you need — and if you do the arithmetic first, you can often get more pieces out of fewer boards by planning your rips and crosscuts.
Thickness, width, length — which is which? Convention varies slightly by plan source, but in most woodworking plans: thickness is the smallest dimension (how thick the board is), width is the narrower face measurement, and length is the longest dimension. When in doubt, the diagrams will make it clear.
Dimensions and views
Good plans show the project from multiple angles. The standard views are:
- Front view: what you see looking straight at the front face.
- Side view: the profile from the left or right.
- Top view (plan view): looking straight down from above.
- Section view: an imaginary slice through the piece, showing the internal structure. Useful for understanding how components nest together.
Dimension lines are thin lines with arrows or tick marks at each end, with the measurement printed in the middle. One common beginner mistake: reading the dimension line without noticing what it’s measuring. A line that spans the full outside of an assembly is an overall dimension; a line that spans just one component is the component dimension. These overlap on many drawings. If two dimensions seem to contradict each other, check whether one is overall and one is a sub-measurement.
Scale and ratios
Plans drawn to scale have a stated ratio — 1:10 means every 10mm on the drawing represents 100mm in the real object. Some simpler plans use a fixed scale bar instead (a line labelled “100mm” you can measure against to work out actual sizes).
For most beginners, scale matters most in two situations:
- When the drawing has no separate dimension labels — you have to measure from the drawing and convert. This is rare in good plans but common in sketchy ones.
- When you’re printing a plan — if you print a PDF that’s been rescaled to fit the page, the scale bar will be wrong and any measurements you take off the drawing will be off. Always check before measuring.
The fix for (2): either print at 100% (no scaling), or rely on the written dimensions rather than measuring off the drawing.
Exploded diagrams
An exploded diagram shows all the parts of the assembly pulled apart from each other along their assembly axes — like an IKEA diagram, but more detailed. They’re one of the most useful elements in a plan because they show the relationship between parts without the visual clutter of everything assembled.
Use the exploded view to:
- Understand the order of assembly (which parts go together first)
- See where joinery happens (dowels, biscuits, pocket screws, mortises)
- Identify parts by label when the assembled views are too compressed to read clearly
Most plans label parts consistently across the cut list, the diagrams, and the exploded view. If part “A” in the cut list is the seat, it should be labelled “A” in every diagram. If the labelling is inconsistent, it’s a sign the plan was put together quickly — slow down and verify each part before cutting.
Joinery notation
Plans use shorthand to show how parts connect. Common notations:
Pocket screws: often shown as a circle with a dot or a small symbol at the joint location, sometimes labelled “PS” or with a note. Pocket screws are a common beginner-friendly joinery choice because they don’t require a lot of skill to execute accurately.
Dowels: shown as a dashed circle at the joint, indicating a hole on each mating face. The plan should specify the diameter and depth.
Mortise and tenon: the tenon (the protruding tongue) is usually shown in section, with the mortise (the receiving hole) indicated on the mating piece. Dimensions for both are typically called out explicitly.
Biscuit joinery: similar to dowels — a dashed slot shape at the joint location.
Dados and rabbets: a dado is a rectangular slot cut across the grain; a rabbet is a stepped cut along an edge. Plans show these in section view and usually label the width and depth (e.g., “6mm × 10mm dado”).
If a plan shows a joint but doesn’t explain how to cut it, that’s a gap — the plan assumes you already know. For beginners, a plan that explains joinery selection rather than just showing the result is more useful.
Materials lists and hardware lists
Most complete plans include a materials list (timber species, sheet goods, any solid timber needed) and a hardware list (screws, brackets, drawer slides, hinges). Read both before starting.
Common beginner traps:
- Assuming nominal vs actual timber dimensions are the same. A “2×4” is actually 1½ × 3½ in (38 × 89mm) once dressed. A plan written for dressed timber won’t work if you’re buying rough-sawn. Check which the plan specifies.
- Missing hardware. A plan that calls for “M6 × 40 bolts” at step 7 and you haven’t bought them means a trip to the hardware store mid-build. Go through the hardware list on day one.
- Sheet good dimensions. Standard plywood sheets are 2400mm × 1200mm in Australia and the UK, 2440mm × 1220mm in North America (4×8 foot). Plans written for one standard won’t necessarily work for the other without adjustment. Check before buying.
A workflow for following a plan
- Read the whole plan before cutting anything. It takes 20 minutes and saves hours.
- Check the cut list against the diagrams. Every part in the list should appear in at least one view.
- Buy and prepare your materials based on the cut list plus 10–15% for waste.
- Label your parts as you cut them — a pencil mark on the inside face keeps everything oriented correctly.
- Dry-fit before gluing. Every assembly should fit together without glue first.
- Follow the assembly sequence the plan specifies — if it says “glue the aprons to the legs before attaching the top,” there’s usually a reason.
A good plan makes all of this easy. A bad plan makes you guess. Our farmhouse bench build uses a complete dimensioned plan and shows this workflow in practice — it’s a useful first project precisely because the plan doesn’t leave anything out.
What a complete plan looks like
The gap between a complete plan and a sketch-with-dimensions is real. A complete plan has:
- A proper cut list with all three dimensions and material callouts
- Multiple views (front, side, top, exploded)
- Joinery detail — not just “join here” but how and with what
- A materials and hardware list
- A finishing note (what species, what finish is compatible)
- An assembly sequence
Sketches downloaded from Pinterest or screenshots of a finished piece don’t provide this. When a build goes sideways, it’s usually because one of these elements was missing. If you’re working from plans that skip these details, it may be worth accessing a proper plan library — our review looks at what the larger collections actually include.